What The Tech: How to back up your entire Facebook profile information
BY JAMEY TUCKER, Consumer Technology Reporter
I got a friend request from someone who’s already on my list. She posted all of the time and then disappeared.
After receiving the last friend request I asked her if her account had been cloned or hacked. What really happened, she said, happens to people every day. They forget their password.
Since many people created Facebook profiles over 10 years ago, they haven’t needed to login again in some time. If you forget the password or get a new computer where you’re not already logged in, Facebook will let you create a new password but it gets complicated if you don’t have access to the email or phone number you had when you first signed up.
Over half of all internet users say they’ve had to stop using an online account because they forgot their password. It might not be a big deal for an old Tumblr or MySpace account, but what if it’s your Facebook? For many of us, Facebook holds years of photos, memories, contacts, and communities, our entire online life.
Every day, people lose access to their accounts because they forget their passwords, or worse, because they’ve been hacked. When that happens, everything they ever uploaded can be gone in an instant.
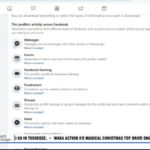
Think of everything you’ve uploaded to Facebook? Now, imagine it going away in a poof. Facebook allows all users to download a copy of all their information. This includes your pictures, contacts, messages, memories, comments, and even the groups you belong to. Before you risk losing access, follow these simple steps to download everything you’ve ever put on Facebook:
Step-by-Step Instructions to Download Your Facebook Data
1. Go to Settings: Log in to Facebook and navigate to your main Settings menu.
2. Find Your Information: In the settings menu, look for and select “Your Facebook
Information” (the exact wording may change slightly over time, but it will be in this
section).
3. Request a Download: Find the option to Download Your Information.
4. Choose Your Data: On the download page, you can choose what you want to save.
○ I highly recommend downloading your profile information and everything you
engage with to a computer. This will cover pretty much all the data you’ve ever
uploaded, including your messages and comments.
5. Select Format & Quality (Crucial Step):
○ By default, your data will often download in HTML format, which is fine for
viewing.
○ However, take it a step further: look for and choose to download it in JSON
format. You don’t need to know what JSON stands for, but this format is much
more versatile for future use if you ever need to import the data somewhere else.
○ Also, select the highest Media Quality available (High) to ensure your photos
and videos are saved at their best resolution.
6. Create File: Click the button to Create File.
7. Wait for the Link: Depending on how much you’ve posted over the years, the file
creation process can take some time. You will get a Facebook notification when your
file is ready, and an email from Meta with a link to download the file.
8. Download Immediately: Be aware: once you get the email, click on the link as
soon as possible. The download link will expire in a few days, and if you miss the
window, you’ll have to start the entire process all over again.
You might not be able to import all of that data into a brand-new Facebook account, but you will have everything saved so those memories live forever, safe and sound on your computer.